|
Start
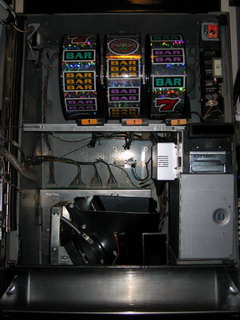
with the top piece of glass. Remove it by
opening the machine's main door and carefully
lifting the old glass holder up and out of the
cabinet frame. Install the new upper
glass. The
reels will be numbered in the order that they are
installed in the machine from left to
right. Lay
out the new strips on a flat surface and take a
comparison look at the strips different symbols. �
If they are all the same and all the symbols line
up with each other then you do not need to be
concerned with which strip goes to which reel. If
however, any strips are different from each other
than you will need to install them in a particular
order depending on the
game. Your
new reel strips have small notches cut in them at
the bottom. There is also a matching notch on each
reel basket. The notches on both the reel strips
and the reel baskets must
NOTE:
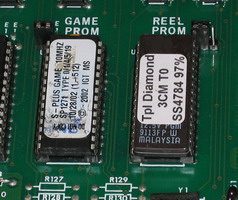
- MOST GAME CHANGES ONLY REQUIRE THE "REEL" (SS) EPROM
TO BE CHANGED. DO NOT REMOVE/CHANGE YOUR "GAME" (SP)
EPROM, UNLESS YOUR NEW GAME SPECIFICALLY REQUIRES
IT TO BE CHANGED. (If
you do change the "GAME" (SP) EPROM chip you will lose
the operational function of your Bill Validator
and it will require a special Set Chip to
re-activate it)
-
Because of this, most Game Kits will not include
a GAME EPROM.
Changing
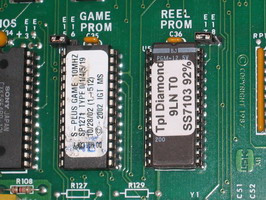
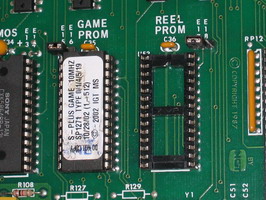
the REEL chip IMPORTANT: Turn the machine's power OFF before removing or inserting the MPU board. Failure to do so may damage the board or the machine. Locate
the chip clearly marked as the "REEL PROM" on the
main board and using a small flat blade
screwdriver, gently pry up one side of the
chip by carefully inserting the blade end of your
screwdriver between the chip and its holding
socket. Make absolutely sure that your screwdriver is between the EPROM and the socket (and not between the socket and the circuit board, causing you to pry the socket off of the board). You will start at one end and then go to
the other end and gently pry up on that side, then
return to the side you started on until the chip
is dislodged evenly from its holding socket. Try
to pull it out as evenly and straight as you can
so you don't damage or bend any of the chips 28
pin legs. If you do you can straighten them out
again but just try to be as careful as you
can.
Install
the new "REEL" chip included with your game kit in
the same direction as the old one that you just
removed. This means the notch in the chip must
install in the same direction. Note that the paper labels may not be in the same orientation -- always look at the physical notch in the chip, and ensure it matches orientation with the notch (half-circle cutout) in the socket. Use caution when
installing the chip so that you do not fold over
any of the chips pins. Go slowly and re-check all
the legs as you go and again afterwards. If one or
more of the legs do get bent, you must straighten
them before proceeding. Next, push down on the top
of the chip firmly until the chip is seated all
the way in its holding socket.
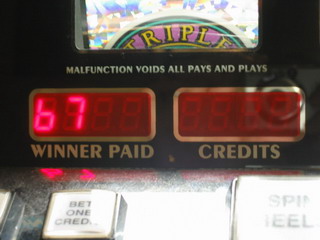
Initializing
the new game: If
you see a 66 or 67 code after making a chip
change, power off the machine, then back
on.
You
should then see a 61 displayed in the winner paid
window.
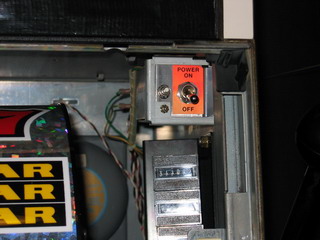
When
you get a 61 press and hold the white test button next to the power switch until
you hear a "Ding" and the display changes to 61 1.
Note:
a common problem that occurs after a game change is
that you will see a 61 1 code after you
hold the test button in and hear the "Ding", but when you close the door and turn the reset key and
nothing happens. This is usually caused by an open
door to the cash storage container or a misaligned
bill validator. Check all your doors to be
certain they are completely closed before closing
the main machine door.
If you encounter a 65 error, or any other error code not listed here, check the Common IGT S+ Error Codes and Resolutions FAQ for further information. |